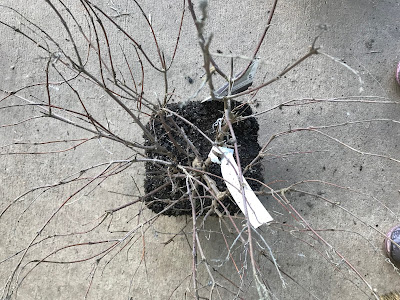
This plant has not grown into it's pot thoroughly yet. Much of the potting mix has still not been reached, let alone held together by roots. You have two options - Option 1. Set aside the loose potting mix and pot the plant with it's small root ball. This plant will need careful attention to how much water is in the potting mix. The only way to know for sure is to feel an inch or two down in the soil with a finger which would ideally be done twice a week for the first couple of months. If it's dry an inch down, water right away. Option 2. Carefully repot the plant and keep it somewhere easy to watch over while it grows a bit more. In Western Oregon, it's best for plants to be planted well before hot weather comes though, so this time of year, you might wait for fall if you're going to wait at all.
Just right -
 |
This plant is very lucky. It's being planted at an ideal time because it has many roots poised and ready to grow into the soil asap, but nothing is circling much or bound up. Nothing needs to be done beyond a bit of very gentle loosening around the edges.
Slightly pot bound - |
 |
| This plant needs a little help getting out into the soil, but it will be very happy and establish quickly. Firmly loosen the roots, breaking as few as you can. Some will break, but that is much better than circling around or staying stuck together. See photos below for a demonstration. |
 |
Now the loosened roots will immediately have access to water and nutrient rich soil.
|
Badly pot bound -
 |
| This plant needs help and drastic measures are called for. The roots are too tightly bound to be able to be loosened so they must be cut. We will discuss two options. |
 |
Option 1 - Butterflying. You would use a saw or knife to split the root mass all the way across the bottom and halfway up. Then loosen the roots as best you can. The demonstration plant needed more help than that, so, in this case, option 2 was the best way to go.
|
 |
Option 2 - Box cut. Use a saw or knife to shave off most of the bound up roots that were touching the edge of the pot. Repeat 4 times creating 4 sides. The bottom also needs to be
either shaved off or cut and loosened.
 |
This is what your plant should look like from above when you are finished - a box with rounded corners.
|
3. Set your plant in the ground so that it's soil level is the same as the ground around it or even a little high. If the crown gets too low, it's more likely to suffer from problems with rot.
4. Refill the hole with only the soil you took out unless it is terribly rocky or otherwise grossly unsuitable.
5. Optional - sprinkle compost on top of the soil. Also optional - sprinkle a small amount of soil on top of the potting mix. If a little soil washes down into the potting mix, it will hold a bit more water.
7. Optional, but highly recommended - mulch with 2-5 inches of organic mulch, such as wood chips, leaves, bark, or grass clippings (with NO chemical herbicides, including weed and feed). This retains moisture, benefits soil structure, and suppresses weeds.
8. Most plants will need regular watering through at least their first summer, even if they are typically drought resistant once established. Don't over water, either, though. For most plants, allow the soil to dry an inch or two down before watering again. Test with your finger or take a peak with a small trowel. It's important to check beneath the surface often.
Happy Gardening Everyone!
|
|


No comments:
Post a Comment